Free Crochet Ghost Patterns: Easy & Cute Decor Ideas
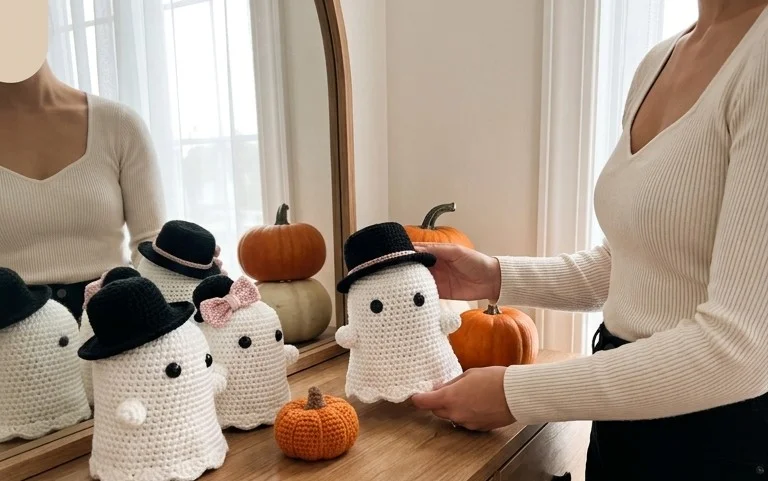
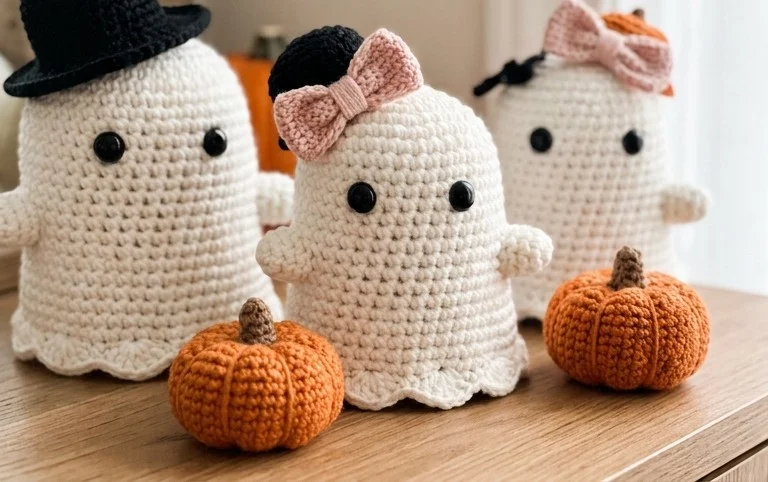
Adorable ghost crochet patterns are the perfect way to add a touch of spooky charm to your home this season! Are you tired of clutter creeping into every corner, making your living spaces feel less like a cozy sanctuary and more like a storage unit? Imagine delightful, hand-crocheted ghosts peeking out from shelves, adorning mantels, or even adding a whimsical touch to your entryway. These little guys are not only incredibly cute but also surprisingly practical, offering a fun way to store small items or simply bring a smile to your face. Best of all, they’re completely free, and most can be whipped up in just a couple of hours, making them a budget-friendly and time-efficient project. In this article, I’ll show you how to create these charming companions, from selecting your yarn to perfecting those sweet little faces!
Unleash Your Inner Boo! Adorable Ghost Crochet Patterns for Delightful Decor and Clever Organization (Free!)
As the crisp air hints at autumn and Halloween approaches, my home naturally gravitates towards cozy, whimsical touches. This year, I’ve fallen head over heels for the charming simplicity of crochet ghosts. They’re not just cute decorations; they’re surprisingly versatile for organization too! And the best part? Many fantastic patterns are available for free online, making this a budget-friendly and incredibly rewarding DIY project.
I’m talking about creating these little spectral friends that can hold anything from spare keys to yarn scraps. Imagine a cluster of them on your entryway table, or a few strategically placed on a shelf to corral small essentials. This isn’t just about making something pretty; it’s about making your home more functional and injecting a whole lot of personality.
Gathering Your Ghastly Goodies: What You Need and Roughly What It Costs
Before we dive into the magic of crochet, let’s talk about what you’ll need to bring these adorable ghosts to life. The beauty of crochet is its accessibility, and you likely have some of these items already.
For each medium-sized ghost, you’ll generally need:
- Yarn: Worsted weight yarn is your best friend here. For a classic white ghost, around 50-75 yards (approximately 45-68 meters) will be sufficient. If you’re feeling adventurous with colours, the yardage remains similar. A skein of good quality acrylic yarn, which is durable and easy to wash, typically costs between $4 and $7. If you plan to make a few ghosts, consider buying a multipack for a slight discount.
- Crochet Hook: A size H/8 (5mm) or I/9 (5.5mm) crochet hook is usually recommended for worsted weight yarn. These hooks are readily available and usually cost around $2-$4.
- Stuffing: Polyester fiberfill is the standard. You’ll need about a cup (roughly 100 grams) per ghost. A bag of stuffing that will last you for many projects is typically $5-$10.
- Yarn Needle: For weaving in ends and sewing pieces together. A set of these is very affordable, often $3-$5 for a pack.
- Scissors: Essential for cutting yarn.
- Safety Eyes or Embroidery Floss: For the ghost’s eyes. Safety eyes (usually small plastic discs that snap into place) are a great option for durability and come in packs of various sizes for $3-$6. If you prefer a hand-stitched look, black or grey embroidery floss will work beautifully and costs around $1-$2 per skein.
So, for one ghost, you’re looking at an initial investment of roughly $10-$20 if you need to buy everything. However, if you’re already a crafter, you’ll likely have most of these supplies, making the cost per ghost significantly lower, perhaps just the price of a new skein of yarn!
Measure Twice, Crochet Once: Planning for Perfection
Before you cast on your first stitch, a little planning goes a long way, especially when it comes to organization. Think about where you want your ghost to live and what you want it to do.
Space Considerations:
* **Entryway Helper:** If you’re envisioning a ghost to hold your keys, measure the depth of your console table or entryway shelf. A ghost around 6-8 inches (15-20 cm) tall is usually ideal. This will allow it to sit comfortably without being too bulky.
* **Desk Buddy:** For holding pens, paperclips, or even charging cables on your desk, a smaller ghost, perhaps 4-6 inches (10-15 cm) tall, might be more suitable.
* **Shelf Enhancer:** If it’s purely decorative, you have more freedom! Consider the height of your shelves to ensure the ghosts don’t overwhelm the space. A mix of sizes can add visual interest.
Organizational Functionality:
* **Open-Top Storage:** Most crochet ghost patterns are designed with an open top, making them perfect for holding small, loose items. Think about what tends to clutter these spaces in your home. Loose change, remote controls, earbuds, small toys – the possibilities are endless.
* **Hanging Options (for Rentals):** If drilling is a no-go, consider patterns that allow for a loop at the top. You can then hang these ghosts using removable adhesive hooks. Measure the space around where you’d like to hang them to ensure they won’t be in the way. A ghost with a loop around 10-12 inches (25-30 cm) from the bottom might hang nicely from a hook.
From Yarn to Spooktacular: Your Crochet Ghost Walkthrough
Most free crochet ghost patterns follow a similar, straightforward process. Don’t worry if you’re new to crochet; these patterns are often designed for beginners!
Here’s a general walkthrough of how I approach creating a crochet ghost:
- **Read the Pattern:** First and foremost, take a few minutes to read through the entire free pattern. Familiarize yourself with the abbreviations (like “sc” for single crochet, “inc” for increase, “dec” for decrease) and the general structure.
- **Create the Base:** You’ll typically start by crocheting a flat circle or a series of rounds to form the base of the ghost’s body. This is usually done using single crochet stitches. The number of rounds here will determine the width of your ghost’s bottom.
- **Build the Body:** From the base, you’ll begin working upwards, often in continuous rounds. This is where the ghost starts to take shape. You’ll work single crochet stitches evenly around each round to create a cylinder.
- **Shape the Head/Top:** As you get closer to the desired height, you’ll start decreasing stitches to create the rounded top of the ghost’s head. This is usually done by working “decrease” stitches (where you crochet two stitches together). The number of decrease rounds dictates how pointed or rounded your ghost’s head will be.
- **Stuffing Time:** Once the opening is small enough to hold stuffing securely but still large enough to maneuver your hands, it’s time to stuff! Gently fill the ghost with polyester fiberfill, aiming for an even, firm consistency. Don’t overstuff, as this can distort the stitches. You want it to hold its shape but still be huggable.
- **Close the Top:** Continue decreasing until the opening is just a few stitches. Weave your yarn needle through the remaining stitches, pull tightly to close the hole, and then weave in your yarn tail securely to prevent it from unraveling.
- **Add the Face:** This is where your ghost gets its personality! Using safety eyes, attach them to the front of the ghost, usually a few rounds down from the top. If you’re using embroidery floss, embroider simple eyes and a mouth. I like to place the eyes about 2 inches (5 cm) apart and the mouth a little below them, giving them a sweet, slightly surprised look.
- **Optional: Hanging Loop:** If your pattern includes instructions for a hanging loop, crochet this now. It’s usually a chain of a certain number of stitches, attached back to the top of the ghost.
Styling Your Spectral Squad: Making Them Shine
Now for the fun part – integrating your handmade ghosts into your home decor!
Colour Palette:
While classic white is undeniably charming, don’t be afraid to experiment.
- **Earthy Tones:** Think muted creams, beiges, and soft grays for a sophisticated, natural look that blends seamlessly into many decor styles.
- **Pastel Haunts:** For a more whimsical feel, try soft pastels like lavender, mint green, or pale blue. These can add a playful pop of colour.
- **Seasonal Splashes:** Incorporate autumnal oranges, deep reds, or even pops of black for a more Halloween-specific vibe.
Texture Play:
The texture of crochet itself is a huge part of its appeal.
- **Mix with Other Textures:** Pair your crochet ghosts with smooth ceramic vases, rough-hewn wood accents, or soft velvet cushions. This contrast adds depth and visual interest to your displays.
- **Natural Elements:** Surround your ghosts with seasonal foliage, dried flowers, or pinecones to enhance the cozy, autumnal atmosphere.
Strategic Placement:
Think about what you want your ghosts to *do*.
- **Entryway Organizer:** Place a ghost or two on your console table. Use them to catch stray keys, pocket change, or even dog treats. A ghost about 8 inches (20 cm) tall with an open top is perfect for this.
- **Desk Companion:** A smaller, 5-inch (12 cm) ghost can sit on your desk and hold pens, sticky notes, or even a small plant.
- **Shelf Statement:** Group a few ghosts of varying sizes on a bookshelf. They can break up the monotony of books and add a touch of personality. If you have taller shelves, consider a ghost with a hanging loop, suspended from a decorative hook, adding a dynamic element.
- **Rental-Friendly Hooks:** For those of us in rentals, removable adhesive hooks are a lifesaver. Hang your ghost-adorned organizers on walls or inside cabinet doors for discreet storage. A ghost with a sturdy hanging loop is essential here.
### Keeping the Haunt Tidy: Organization Week After Week
The beauty of these crochet ghosts as organizers is their simplicity. Keeping them tidy is just as easy.
- **Regular Purge:** Once a week, dedicate a minute or two to emptying your ghost’s “storage.” Toss coins into your piggy bank, put keys in their designated spot, or file away papers. This prevents clutter from accumulating.
- **Gentle Shaking:** For items like pens or small toys, a gentle shake of the ghost can help redistribute them if they’re getting bunched up.
- **Dusting:** Like any home decor item, your crochet ghosts will accumulate dust. A quick swipe with a dry microfiber cloth or a soft brush will keep them looking their best.
The Spooky Slip-Ups: Mistakes That Make This Fail
Even with the simplest of projects, there are a few pitfalls to watch out for.
- **Understuffing:** If you don’t stuff your ghost enough, it will be floppy and won’t hold its shape, making it look sad and unappealing. It also won’t be very effective as an organizer. Aim for firm, but not rock-hard, stuffing.
- **Loose Tension:** If your crochet tension is too loose, your stitches will have large gaps, and your ghost might stretch out or look a bit saggy. Practice your tension on a small swatch before starting if you’re concerned.
- **Overstuffing:** Conversely, overstuffing can distort the shape of your ghost and make the stitches look strained. It’s a delicate balance!
- **Ignoring the Pattern Instructions:** While improvisation is fun, sticking to the core instructions of a free pattern, especially for shaping and stitch counts, is crucial for a successful outcome.
- **Not Securing Ends:** Failing to weave in yarn tails securely can lead to your ghost unraveling over time, especially if it’s being used for storage. Always take the time to weave them in thoroughly.
- **Not Considering Weight/Stress:** If you’re using your ghost to hold heavier items, make sure it’s well-constructed and firmly stuffed. A poorly made ghost might stretch or even tear under strain, especially if it’s hanging.
Creating these adorable crochet ghosts is such a fulfilling project. They’re a delightful way to add a touch of handmade charm to your home, and with a little planning, they can become functional organizers too. So grab your hook, find a free pattern, and get ready to crochet some serious cuteness!
Conclusion
Incorporating these adorable ghost crochet patterns into your home decor can truly brighten your everyday. A touch of handmade charm can transform a sterile space into a cozy haven, bringing a smile to your face as you pass them by. The simplest first step to start your spooky season is to grab your hook and some yarn and try just one of the free patterns. Imagine a trio of these little ghosts perched on your mantelpiece, or perhaps a single, larger one guarding your bookshelf.
Variations for a Different Room or Budget:
For a different vibe, consider a more subtle approach with smaller ghost appliques stitched onto plain cushions for a guest room, or if budgets are tight, even a single, well-placed ghost can make a delightful statement.
We hope you’ve been inspired to bring some crocheted cheer into your home. Keep exploring for more delightful decor and organization ideas!