Easy Spooky Cemeterrium Ideas for Halloween Decor
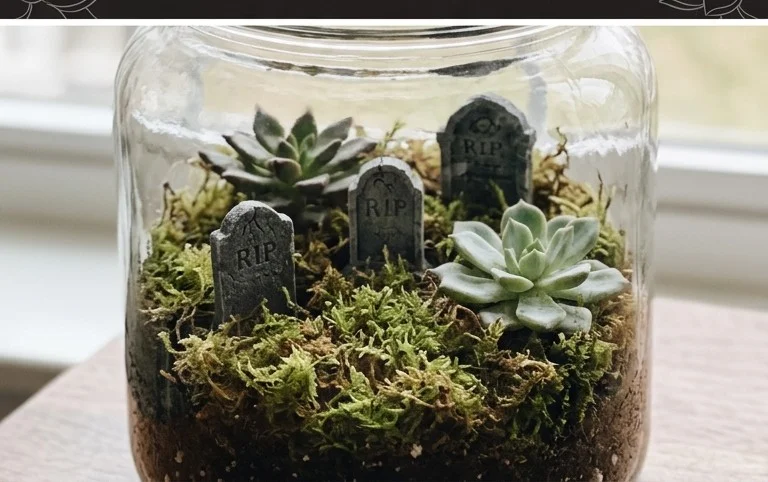
Cemeterriums are the spooky little piece of Halloween magic we never knew we needed! Are you tired of your holiday decor feeling a bit… uninspired? Maybe your shelves are looking a little bare, or you’re struggling to find that perfect touch that screams “festive and frightful” without being overly done? Well, I’ve found a wonderfully wicked solution: the cemeterrium. Imagine a miniature, beautifully curated graveyard scene, complete with tiny tombstones, mossy accents, and perhaps a flickering LED candle or two, all nestled in a charming planter or decorative bowl.
These miniature marvels can be surprisingly affordable, often costing less than $30 to create, and are usually a weekend project, taking just a few hours. In this article, I’ll guide you through the simple steps to assemble your own hauntingly gorgeous cemeterrium, sharing tips on selecting the perfect components and arranging them for maximum eerie impact. Get ready to add that essential, delightful touch of spooky to your home this Halloween!
Embrace the Elegance of the Eerie: Creating Your Own Halloween Cemeterrium
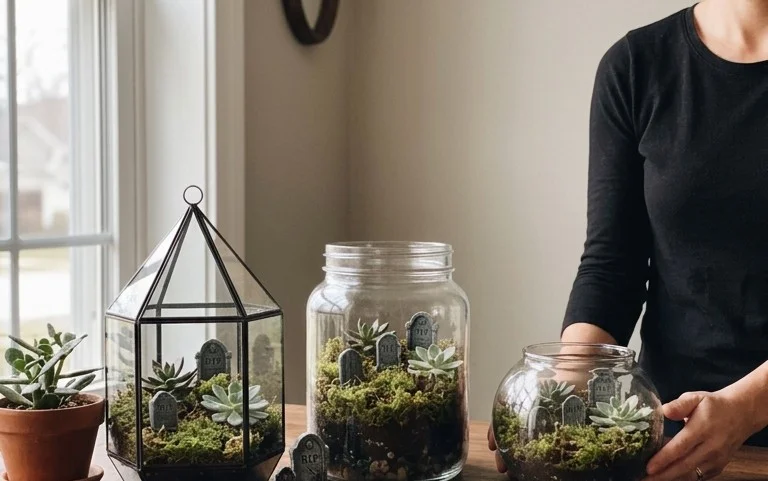
This year, I’ve fallen head over heels for a décor trend that’s both delightfully spooky and surprisingly sophisticated: the cemeterrium. Forget the cobwebs and plastic ghosts of Halloweens past. A cemeterrium is a curated, miniature graveyard display, often housed in a glass cloche, terrarium, or even a repurposed apothecary jar. It’s that little piece of gothic charm, a touch of the macabre, that elevates your Halloween décor from kitschy to chic. It’s a statement piece that whispers tales of mystery and enchantment, and I’m here to guide you through creating your own.
What You’ll Need and Roughly What It Costs
The beauty of a cemeterrium lies in its versatility, and you can tailor the supplies to your budget and aesthetic. Here’s a breakdown of what you’ll generally need, with some rough cost estimates:
* **The Container:** This is your foundation.
* **Glass Cloche with Base:** You can find these at home décor stores, antique shops, or online. A medium-sized cloche (around 10-12 inches tall) with a wooden or slate base might cost between $30-$75. Larger ones will, of course, be more.
* **Glass Terrarium (Closed or Open):** A popular choice for a more enclosed, self-contained graveyard. A medium-sized, enclosed terrarium (approx. 8-10 inches in diameter) could be around $40-$90. Open terrariums offer more flexibility for placement of taller elements.
* **Repurposed Jars/Bowls:** Get creative! Large apothecary jars, fish bowls, or even deep glass cake stands can work beautifully and are often much more affordable, potentially under $20-$40.
* **The “Ground”:** This is what your graveyard will sit on.
* **Black Craft Sand or Fine Gravel:** About 1-2 pounds should be sufficient for most medium-sized displays. Budget around $5-$10.
* **Dark Potting Soil or Peat Moss:** For a more organic look. Again, 1-2 pounds will likely suffice. $3-$8.
* **Black Felt or Cardstock:** For a completely flat, no-mess base. A yard of felt is around $5-$15.
* **The Gravestones:** This is where the personality shines!
* **Miniature Tombstones:** You can buy these specifically for model railways or dollhouses. Individual stones can range from $2-$10 each. Look for ones made of resin, plaster, or even wood.
* **DIY Cardboard/Foam Board:** Cut out shapes from black or grey cardstock or thin foam board. You can even print miniature epitaphs. A pack of cardstock is under $5. Foam board is around $5-$10 for a large sheet.
* **Small Stones or Pebbles:** Collect them from your garden or a craft store. You can paint them grey or black. Negligible cost if collecting.
* **The “Flora”:**
* **Miniature Artificial Trees or Bushes:** Look for dark green, black, or even silver artificial plants in craft stores. Small clusters can be $5-$15.
* **Dried or Artificial Moss:** Adds texture and a sense of age. A small bag is usually $5-$10.
* **Twigs and Small Branches:** Collect from your yard for a natural, spooky feel. Free!
* **The “Inhabitants” (Optional but recommended!):**
* **Miniature Skeletons or Skulls:** Toy stores or craft stores are your best bet. Small skeletons can be $5-$15.
* **Miniature Bats or Spiders:** Again, craft stores. A small pack can be $3-$8.
* **Tools:**
* **Small Shovel or Spoon:** For scooping and arranging your base material.
* **Tweezers:** Essential for placing small elements precisely.
* **Paintbrush (small):** For dusting with pigment or adding details.
* **Craft Glue or Hot Glue Gun:** For securing elements if needed.
**Rough Total Cost:** Depending on your container choice and how many embellishments you go for, you’re looking at anywhere from $50 to $200 for a truly spectacular cemeterrium. However, with smart shopping and repurposing, you can create something wonderfully eerie for under $75.
Measuring and Planning Before You Start
Before you dive headfirst into graveyard creation, take a moment to plan. This will save you frustration and ensure your cemeterrium looks intentional and not haphazard.
1. **Measure Your Container:** This is the most crucial step.
* **Diameter/Width:** Note the widest point of your container. This will dictate how many elements you can fit horizontally.
* **Height:** Measure from the base to the highest point. This will determine the maximum height of your tombstones, trees, and any figures. Don’t forget to factor in the height of your base material.
2. **Sketch Your Layout:** Grab a piece of paper and draw a rough bird’s-eye view of your container’s base.
* **Focal Points:** Where do you want your main tombstones to be? Will there be a central, larger monument?
* **Depth:** Think about creating layers. Some tombstones can be placed further back, some closer to the front.
* **Height Variation:** Don’t make everything the same height. Varying the heights of your tombstones and trees will add visual interest.
* **Negative Space:** Remember that not every inch needs to be filled. Empty spaces can be just as impactful, adding to the eerie atmosphere.
3. **Consider Your Theme:** Are you going for a classic, moss-covered graveyard? A more stark, modern gothic feel? Or perhaps a playful, haunted forest vibe? Your theme will inform your material choices.
Your Step-by-Step Cemeterrium Creation
Now, let’s get our hands dirty (or at least our tweezers)!
1. **Prepare Your Container:** Ensure your glass container is clean and dry. If you’re using a cloche, make sure the base is sturdy and flat.
2. **Lay Your Foundation:**
* If using sand or gravel, pour a layer of about 0.5-1 inch deep into the bottom of your container. Use your small shovel or spoon to spread it evenly.
* If using soil or peat moss, do the same, creating a slightly more natural, uneven surface if desired.
* If using felt or cardstock, cut it to fit the base of your container precisely.
3. **Place Your Gravestones:** This is where your sketch comes in handy.
* Start with your larger or more prominent tombstones. Position them according to your plan, pushing them slightly into the base material so they stand upright.
* Add smaller tombstones, varying their placement and angles. You can have some leaning slightly for an aged effect.
* If making your own tombstones, now is the time to glue on any printed epitaphs or add painted details.
4. **Introduce Your “Flora”:**
* Place your miniature trees or bushes around the tombstones, creating clusters or lining pathways. Think about how trees grow in a real cemetery – some dense, some more sparse.
* Add clumps of moss around the bases of tombstones or nestled amongst the plants to create an aged, overgrown look.
5. **Add Your Inhabitants (Optional):**
* Carefully position your miniature skeletons, skulls, bats, or spiders. A skeleton peeking out from behind a tombstone, or bats clinging to a tree, can add a fantastic touch of life (or afterlife!) to your scene. Use tweezers for precision.
6. **Final Touches and Clean-Up:**
* Gently brush away any loose sand or debris from the edges of your container.
* If your container has a lid (like a cloche), carefully place it over your creation.
Adapting for Small Spaces or Rentals
Don’t have a sprawling mansion or the freedom to drill holes? No problem! Your cemeterrium can be adapted.
* **Small Space Solutions:**
* **Verticality is Key:** Opt for taller, narrower containers like apothecary jars or even stacked glass cylinders. This maximizes your display area without taking up much horizontal space.
* **Wall-Mounted Shelves:** If you have a narrow wall shelf, a cloche-style cemeterrium can be a perfect fit, drawing the eye upwards.
* **Smaller Scale:** Don’t try to cram too much into a tiny container. A few well-chosen elements can be more impactful than a crowded display. Think one or two impactful tombstones and a single, gnarled tree.
* **Rental-Friendly Options (No Drilling!):**
* **Tabletop Displays:** Cloches, terrariums, and apothecary jars are ideal as they sit entirely on existing surfaces.
* **Command Hooks/Strips:** For hanging miniature bats or spiders from the inside of the container (if applicable and safe), use small, removable adhesive strips. Ensure they are rated for the weight.
* **Weighted Bases:** If you’re using a cloche that’s slightly wobbly, consider a heavier, non-slip mat under the base to keep it secure.
* **Avoid Adhesives on Surfaces:** Never glue anything directly to rental walls or furniture. Stick to your chosen container.
Styling Notes: Color, Texture, and Placement
Once your cemeterrium is assembled, a few styling tricks can take it from good to ghastly gorgeous.
* **Color Palette:** Stick to a limited palette. Deep blacks, charcoal greys, mossy greens, and muted browns are your best friends. A touch of antique brass or silver for accents can add sophistication. Avoid bright, jarring colors.
* **Texture is Everything:** Mix textures to create visual interest. The roughness of the sand, the smoothness of the glass, the gnarled bark of twigs, the softness of moss – these all contribute to the atmosphere.
* **Placement for Impact:**
* **Foreground:** Place your most striking tombstones or figures towards the front so they are immediately visible.
* **Background:** Use taller elements like trees or slightly larger tombstones to create a sense of depth in the back.
* **Asymmetry:** Avoid perfect symmetry. Real graveyards are rarely neat and tidy. Slightly off-kilter tombstone placement or scattered leaves add authenticity.
* **Lighting:** If your container allows, consider a small, battery-operated LED light (often a warm white or subtle purple) placed strategically within the cemeterrium to cast eerie shadows.
Keeping It Tidy After Week One
The initial awe might fade slightly as dust bunnies consider taking up residence. Here’s how to keep your cemeterrium looking its spooky best:
* **Gentle Dusting:** Use a soft paintbrush or a can of compressed air to gently remove dust from your tombstones and plants. Be careful not to dislodge anything.
* **Base Maintenance:** If your sand or soil base gets disturbed, use your small shovel or spoon to gently reshape it.
* **Air Circulation (if applicable):** If you have an open terrarium, briefly airing it out can prevent any mustiness.
* **Check for Loose Elements:** Periodically check if any tombstones or decorative items have shifted and re-secure them as needed.
Common Mistakes That Make Cemeterriums Fail
Even the most enthusiastic decorator can stumble. Here are a few pitfalls to avoid:
* **Overcrowding:** Trying to cram too many elements into a small space makes it look messy and loses its impact. Less is often more.
* **Wrong Scale:** Using miniatures that are too large or too small for your container will throw off the entire aesthetic. Ensure your tombstones and figures are proportionate to each other and to the container.
* **Too Much Shine:** Unless you’re going for a very specific, kitschy look, avoid glitter and overly shiny plastic elements. They can detract from the sophisticated spookiness.
* **Lack of Depth:** A flat display with everything at the same level is boring. Vary heights and use elements to create a sense of perspective.
* **Ignoring the Base:** A messy or uneven base can ruin the look. Take the time to create a clean, intentional foundation.
* **Forgetting the “Eerie” Factor:** If it looks too much like a garden display, it’s missing that Halloween magic. Introduce darker colors, perhaps a slightly crooked tombstone, or a shadowy figure.
Creating a cemeterrium is a rewarding and incredibly fun way to embrace the Halloween spirit. It’s a chance to blend artistry with a touch of the delightfully dark. So, gather your supplies, unleash your inner macabre decorator, and prepare to be enchanted by your very own miniature world of the wonderfully eerie.
Conclusion
Embracing the playful spookiness of a cemterior isn’t just for Halloween; it’s about infusing your home with a touch of the unexpected, a conversation starter that brings a unique personality to your space. This little piece of spooky can genuinely lift your non-alcoholic spirits day to day, adding a whimsical flair that’s both intriguing and charming.
Ready to dive in? Your smallest first step could be as simple as acquiring a miniature tombstone or a faux spiderweb to test the waters in your favorite corner. For a different vibe or budget, consider a “haunted library” shelf with antique-looking books and cobwebs, or a dimly lit “potion room” nook with apothecary jars. There are so many ways to explore this enchanting trend.
Ready for more?
We invite you to discover even more creative ideas to transform your home into a wonderfully eerie haven. Keep exploring!