Easy Fall Crochet Centerpiece: Free Pattern & Tutorial
Fall crochet centerpiece inspiration is here, and I’ve got something special to help you banish those bare tabletops! Do you find yourself staring at your dining room table, feeling a little uninspired, maybe even a touch cluttered as summer fades? We’ve all been there, right? That empty space can feel like a missed opportunity for cozy charm. Well, get ready to transform it! Imagine a stunning, warm-toned centerpiece, beautifully crocheted with intricate texture, that instantly brings the inviting spirit of autumn into your home. This project is surprisingly affordable – just the cost of some yarn and takes only a few hours to complete, making it perfect for a weekend craft. I’ll walk you through every single stitch with a free pattern and a super helpful video tutorial. You’ll learn how to create beautiful rounds and add delightful, rustic detail. Let’s get crafting!
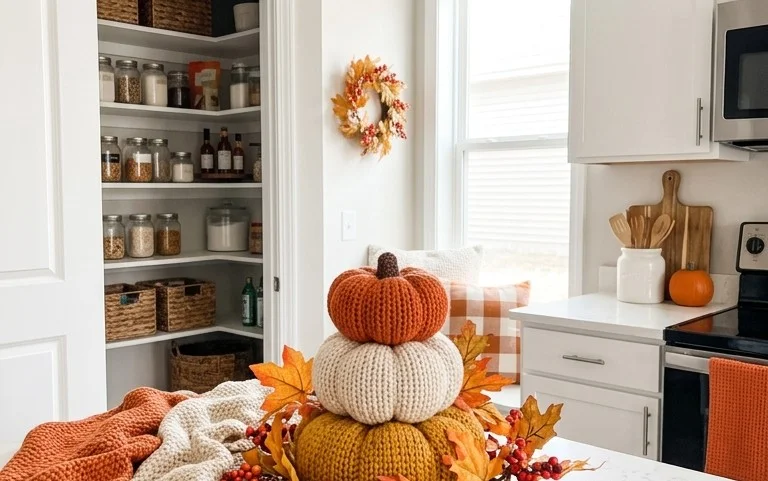
Craft a Cozy Welcome: Your Fall Crochet Centerpiece Free Pattern & Tutorial
As the leaves begin to turn and a crispness fills the air, I always feel a pull to bring that cozy, autumnal feeling inside. One of my favorite ways to do this is by creating a beautiful, handmade centerpiece for my dining table or entryway. This year, I’m so excited to share this winding road crochet centerpiece pattern with you all! It’s designed to be simple enough for beginners but with enough visual interest to impress, and the best part is, it’s completely free! I’ll walk you through everything you need, from yarn to styling, to ensure your creation becomes a stunning focal point in your home.
Gathering Your Supplies: What You Need & Estimated Cost
Before we dive into the actual crocheting, let’s talk about what you’ll need. This project is designed to be accessible, so you likely won’t need to buy a whole new craft stash.
Materials:
- Crochet Hook: I recommend a 5.5mm (US I/9) hook. This size works beautifully with medium-weight yarn and creates a nice drape.
- Yarn: For this centerpiece, I suggest using a medium-weight (worsted weight) yarn. You’ll need approximately 300-400 yards in total. For a classic fall look, I love using shades of pumpkin orange, mustard yellow, deep brown, and cream. You can mix and match! Aim for around 100 yards of each of your main colors, and perhaps 50 yards of accent colors. A good quality acrylic yarn is durable and budget-friendly, often costing between $4-$6 per skein (100g/200 yards). So, for this project, you’re looking at an estimated yarn cost of around $20-$30. If you have leftover yarn from other projects, this is the perfect opportunity to use it up!
- Scissors: Any sharp pair will do!
- Yarn Needle: For weaving in those pesky ends.
- Measuring Tape: Essential for planning.
Measuring and Planning: Setting Yourself Up for Success
Before you even pick up your hook, take a moment to measure your space. This is crucial for ensuring your centerpiece fits perfectly.
- Dining Table: Measure the length and width of your dining table. You’ll want your centerpiece to be proportional. For a standard 6-foot (180 cm) table, a centerpiece around 24-30 inches (60-75 cm) long and 8-10 inches (20-25 cm) wide is usually ideal.
- Coffee Table or Entryway Table: Measure the surface area. For a smaller coffee table, aim for something around 18-24 inches (45-60 cm) long and 6-8 inches (15-20 cm) wide.
- Rental Considerations: Since we can’t drill or permanently attach things in a rental, this centerpiece is perfect because it’s free-standing. You’ll simply place it on your table.
For this “winding road” design, we’ll be creating a long, rectangular base with some decorative elements. The length is determined by how many “road segments” you crochet, and the width is controlled by your stitch count. I usually aim for a base that is about 8 inches (20 cm) wide. This requires chaining approximately 28-30 stitches to start.
The Winding Road Crochet Centerpiece: A Step-by-Step Walkthrough
This pattern uses basic crochet stitches, making it very beginner-friendly. We’ll be working in rows to create the base, and then adding some simple textured elements.
Instructions:
- Foundation Chain: Chain 30 stitches. This will create the initial width of your centerpiece.
- Row 1: Single crochet (sc) in the second chain from the hook and in each chain across. You should have 29 single crochets.
- Row 2: Chain 1 (does not count as a stitch), turn. Single crochet in each stitch across. You should still have 29 single crochets.
- Repeat Row 2: Continue crocheting rows of single crochet until your piece measures your desired length. For a 24-inch (60 cm) centerpiece, you’ll need roughly 70-80 rows, depending on your tension. Don’t worry too much about an exact number; just keep going until it looks right!
-
Creating the “Road”: Now, we’ll add some texture to mimic the winding road.
- Row (X+1): Chain 1, turn. In the first stitch, work a front post double crochet (fpdc) around the post of the stitch from the row below. In the next stitch, work a back post double crochet (bpdc) around the post of the stitch from the row below. Alternate fpdc and bpdc stitches across the row. This creates a raised, ribbed texture.
- Row (X+2): Chain 1, turn. Work your stitches as they appear – if you see a fpdc from the previous row, work a fpdc around it; if you see a bpdc, work a bpdc around it. Continue this for 2 more rows. This establishes your “road” texture.
-
Adding the “Path” Edges: We’ll create a slightly different textured edge to give the illusion of a path.
- Row (X+5): Chain 1, turn. Work a single crochet in the first stitch. Then, work a half double crochet (hdc) in the next stitch. Continue alternating single crochet and half double crochet stitches across the row.
- Row (X+6): Chain 1, turn. Single crochet in the first stitch. Half double crochet in the next stitch. Alternate single crochet and half double crochet stitches across the row. Repeat this row for about 4-6 rows. This creates a slightly looser, textured edge.
- Finishing: Fasten off your yarn and weave in all loose ends using your yarn needle.
Adapting for Small Spaces and Rentals
The beauty of this project is its adaptability. For smaller spaces, you can simply make your foundation chain shorter to reduce the width. For example, a chain of 20 would give you a width of about 6 inches (15 cm). For length, just crochet fewer rows. As mentioned, it’s perfect for rentals because it’s a free-standing decorative piece, requiring no permanent fixtures.
Styling Your Winding Road Centerpiece
Now for the fun part – making it look fabulous!
Color and Texture:
- Color Palette: Stick to warm, earthy tones for fall. Think deep reds, burnt oranges, mustard yellows, olive greens, and creamy whites. I love using a gradient effect, starting with a darker color at one end and gradually transitioning to lighter shades.
- Texture: The “winding road” texture itself adds visual interest. You can enhance this with other elements.
Placement and Embellishments:
- The “Road”: The textured part of your centerpiece is designed to mimic a path. Consider placing small, natural elements along this path.
-
What to Put Where:
- Small gourds or pumpkins: A few miniature pumpkins in varying shades look fantastic. Place them at intervals along the textured “road.”
- Acorns and pinecones: These natural treasures add a rustic touch. Scatter them artfully.
- Faux leaves: A few scattered faux maple or oak leaves can add a pop of color.
- Candles (use caution!): Battery-operated LED pillar candles can add a warm glow. Place them on the wider, flatter sections of your centerpiece, away from any flammable elements.
- Small floral arrangements: Consider tucking in a few sprigs of dried eucalyptus or artificial fall foliage.
- Balance: Don’t overcrowd the centerpiece. The beauty is in its simplicity and the interplay of textures. Aim for an asymmetrical arrangement for a more natural look.
Keeping it Tidy After Week One
After the initial styling, keeping your centerpiece looking fresh is easy.
- Dusting: A gentle dusting with a soft cloth or a feather duster will keep it looking clean.
- Adjusting Elements: Over the week, things might shift slightly. Take a moment every few days to reposition your gourds, acorns, or leaves to maintain the desired aesthetic.
- Loose Threads: If you notice any loose threads from your crochet work, simply snip them off carefully with your scissors.
Common Mistakes That Make This Fall Centerpiece Fail
Even the simplest projects can have a few pitfalls. Here are some things to watch out for:
- Tension Issues: If your tension is too tight, your stitches will be stiff and your centerpiece won’t have a nice drape. If it’s too loose, it can look messy. Practice a few rows before starting your main piece to get a feel for your tension with the yarn and hook.
- Incorrect Stitch Count: Not counting your stitches regularly, especially in the beginning, can lead to a lopsided or uneven piece. Always check your stitch count after each row to ensure you have the correct number.
- Overcrowding: This is probably the biggest mistake! Trying to cram too many decorative elements onto your centerpiece will make it look cluttered and lose its charm. Less is often more with decorative items.
- Ignoring Measurements: Not measuring your table space beforehand can result in a centerpiece that’s either too big or too small for your intended spot.
- Forgetting to Weave in Ends: Leaving loose yarn ends will make your finished piece look unfinished and can snag on things. Take the time to weave them in securely!
Creating this winding road crochet centerpiece is a rewarding project that adds a personal touch to your fall decor. It’s a wonderful way to practice your crochet skills, experiment with color and texture, and bring a touch of handmade warmth into your home. Happy crocheting!

Conclusion
Adding a touch of handmade warmth to your home, like this lovely fall crochet centerpiece, can truly transform your everyday spaces. Imagine the cozy feeling it brings to your table, making even a simple meal feel special. Don’t let the idea overwhelm you; your smallest first step could be simply gathering your yarn and hook today. If a full centerpiece feels like too much right now, consider creating a few smaller crochet coasters for your coffee table, or a simple single-motif placemat for your desk. We invite you to explore more delightful home decor and organization ideas right here on Winding Road Crochet!
